Installing Neatline
At a glance
- Installing Neatline is a two-step process - first install Omeka, then install Neatline as a plugin for Omeka.
- For projects that incorporate custom imagery, a third piece of software called Geoserver is necessary.
Before you start
Omeka is a web application written with PHP and MySQL that runs on the “LAMP stack” (Linux, Apache, MySQL, and PHP), a ubiquitous set of technologies supported by almost any commercial or institutional hosting provider - many web hosts even provide an automatic “one-click” installer. See the Hosting Suggestions guide in the Omeka documentation for a list of recommended providers. Alternatively, if you just want to experiment with Neatline in an offline setting, your can also install Omeka on a sandbox server environment running on your own computer using software packages like MAMP, WampServer, or XAMPP, with the option of migrating the site to a public-facing web host at any point in the future.
Either way, you’ll need the following:
- A server environment with PHP (5.2.11 or greater), MySQL (5.0 or greater), and Apache.
- Credentials for a MySQL user and the name of a database for the Omeka installation.
- Permission to add and edit files to the server.
For more detailed system requirements, see the Preparing to Install guide in the Omeka documentation.
Installing Omeka
First, install Omeka by following the instructions in the Installation guide.
Installing Neatline
Once Omeka is up and running, install the Neatline plugin:
-
Download the most recent version of Neatline, unpack the
.ziparchive, and move theNeatlinefolder into/plugins. -
In the Omeka administrative interface, click on the Plugins link on the top navigation bar and find the listing for Neatline.
-
Click the Install button.
You’ll be redirected back to the list of plugins and see a notification saying that “The Neatline plugin was successfully installed.” Over in the main vertical navigation on the left side of the screen, you’ll see a new listing for Neatline - click there to get started.
Configuring the Neatline Plugin (for versions 2.5.2 and above):
Neatline users must now specify a Google Maps API Key to use the Google Map layers as a configuration step after installing the Neatline plugin. Neatline for Omeka Classic also comes with open source map options, Open Street Map and Stamen maps, which do not require an API key.
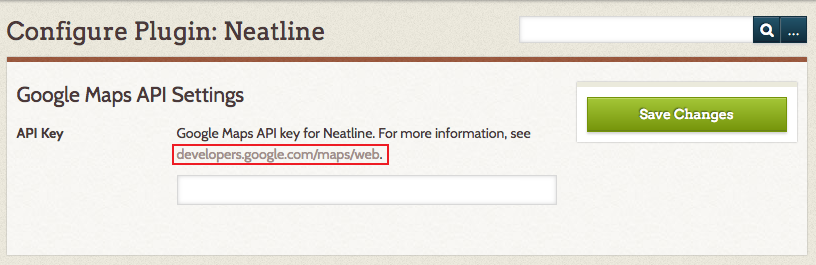
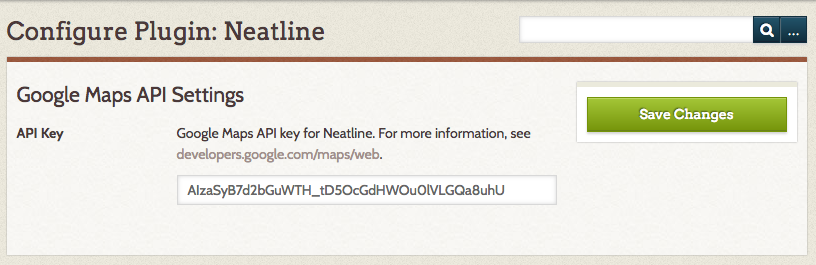
Google Maps API Settings
-
On the Plugins Screen, click the Configure button.

-
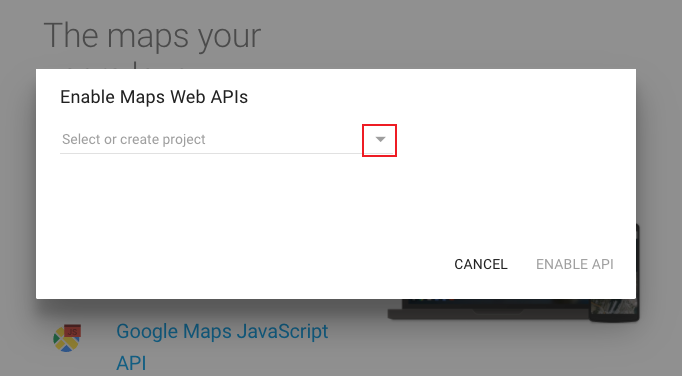
Click the link to open the Google Maps Developer’s page, and then click the Get a Key button.
-
On the Enable Maps Web APIs popup, enter a project name or click the down arrow to select the default name, My Project.
-
Once your Project Name has been entered, or the default My Project has been selected, click the Enable API button to generate your API key.

-
Copy the API Key and paste it into the Neatline plugin configuration text box.
-
Click the green Save Changes button. Your installation is now properly configured to use any of the Google base maps that are packaged with the Neatline plugin.
Installing Geoserver
With Omeka and Neatline installed, you can get started building exhibits on top of modern-geography base layers (OpenStreetMap, Google Maps, and Stamen Maps). For many use-cases, the default layers are more than sufficient, and no other action is necessary.
For projects that need to incorporate custom imagery - for example, historical projects that want to overlay georeferenced maps on top of the default layers, or art history projects that need to use scans of paintings as base layers in exhibits - a third piece of software called Geoserver is necessary.
Geoserver is a high-performance, open-source geospatial server that runs in a Java Servlet Container like Tomcat, Jetty, or JBoss. Basically, Geoserver is responsible for taking high-resolution GeoTIFF’s - images that are keyed onto spatial coordinates - and selectively doling out just the section of the image that’s necessary to fill the viewport as a user pans and zooms the map in Neatline. This is such a computationally-intensive task that it requires a separate, standalone piece of software.
The OpenGeo Suite (community edition) maintains packages for several of the more popular operating systems to ease the management of upgrading and configuring GeoServer. That said, the process of installing and maintaining a Java server environment generally requires quite a bit more technical expertise than what’s needed to get up and running with Omeka and Neatline. Geoserver is built on top of a more complicated suite of technologies, and tends to need a higher level of ongoing maintenance.
If you don’t have the resources to manage your own installation, there are a couple of options. First, if you’re associated with a a college or university, check to see if your institution could provide assistance - managing complex software like Geoserver is often the sort of thing that falls under the purview of central IT services. Second, you can always purchase Geoserver hosting from a commercial provider - we’ve had good experiences with AcuGIS, which actually provides all-in-one Geoserver, Omeka, and Neatline hosting (they have a one-click Neatline installer, and offer discounts for academic users). Check out their FAQ for more information.