Working with the SIMILE Timeline Plugin
Definition
The SIMILE Timeline web plugin allows users of Neatline to add interactive timeline components to their Neatline exhibits. The plugin is open source software originally developed as part of the SIMILE project with funding from the Andrew W. Mellon Foundation.
Download the latest version of the plugin.
Enabling SIMILE Timeline for an Exhibit
The SIMILE Timeline plugin is enabled from the main Exhibit Settings screen, either when first setting up the exhibit or by editing the settings later.
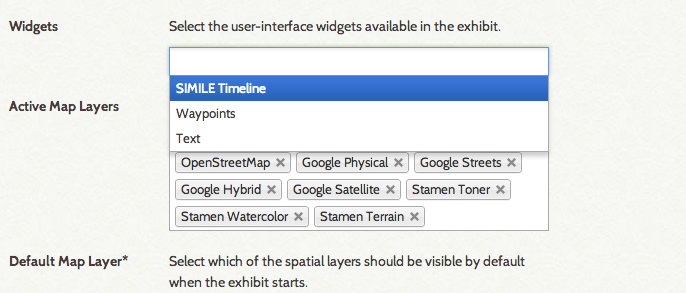
To enable the Timeline plugin, click once in the widgets box, then click on SIMILE Timeline in the drop down list to turn the plugin on for the exhibit.
Plugin Settings
The settings that control the timeline’s appearance are found in the Plugins tab on the Neatline editor screen, accessed by clicking the title of the Neatline exhibit from the Browse Exhibits list.
Click on Plugins, then click SIMILE Timeline to open the Timeline Settings editor.
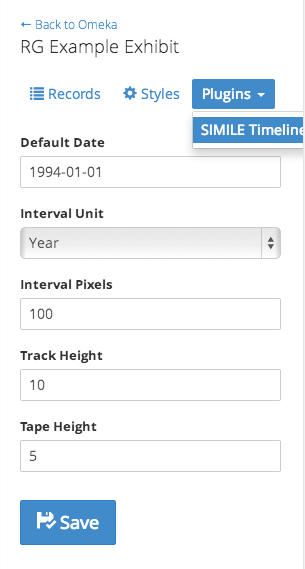
Default Date
The default date setting centers the timeline on the date entered. The default value for this setting is the current date/time, as defined by the server on which the Omeka + Neatline software is running.
SIMILE Neatline requires the ISO-8601 date format for all dates entered. The format is YYYY-MM-DDTHH:MM:SS, where T is the delimiter alerting the software that a Time value follows.
Please see the Date Formatting section of this document for examples.
Interval Unit
Interval Unit defines the unit of measurement for the timeline. Users select the most relevant time increment from the drop down list. Available interval values include Millennium, Century, Decade, Year, Month, Week, Day, Hour, Minute, or Second. The default value for this setting is Year.
Interval Pixels
The interval pixels setting defines how long each interval on the timeline will be, in pixels. The default setting is 100 pixels. The maximum setting is 500 pixels.
The minimum setting depends on the time interval selected for the Interval Unit. Users will wish to select an interval at which the timeline’s interval units are legible to an exhibit viewer, given the number of events that will be appearing on the timeline. As an example, if the Interval Unit selected is Seconds, the Interval Pixels value might be set as low as 30 pixels; if the Interval Unit is Year, the Interval Pixels value would need to be set at 40 pixels or higher.
Track Height
The Track Height value defines the height in pixels used by the timeline event tape, plus the label on the timeline event. Users will wish to select a value that allows all tapes and their labels to be legible for viewers.
The default Track Height value is 30 pixels. The max value is 500 pixels. The min value is 0 pixels. Please note that the actual viable range for Track Height is between 20 pixels and about 50 pixels, depending on the value selected for Tape Height and the number of events on the timeline. The Track Height will not display a value too low in order to display both the event tape and the label.
Tape Height
Tape Height is the value, in pixels, that defines the height of the tape representing a timeline event.
The default value for Tape Height is 10 pixels. The max value is 500 pixels. The min value is 0 pixels. Please note that the actual viable range for Tape Height is between 3 pixels and about 40 pixels, depending on the value selected for Track Height and the number of items on the timeline.

Adding an Item Record to the Timeline
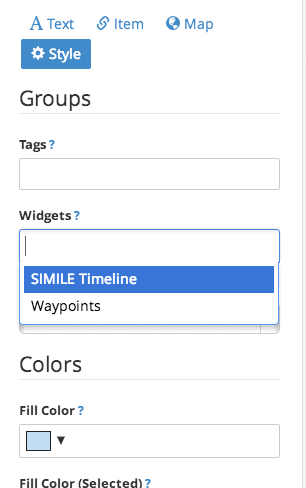
To include a Neatline item on the timeline, on the Style tab in the Neatline Item editor, select SIMILE Timeline in the plugin drop down box and populate the Date fields on the Style tab. The Title of the Neatline item record will appear as the label on the event point or tape, and the color value will match that selected for the point or shape drawn to represent the event on the map.
Dates
Start and End Dates
The dates that mark the beginning and end of an event, a person’s life, the existence of a building or structure.
To render an event as a single point on the timeline, fill in only the Start Date.
If both Start and End Dates for an event are populated, SIMILE Timeline will create an event tape on the timeline.
NOTE: if the Start and End Dates are the same value, the span will have width of 0 pixels and will not be visible.
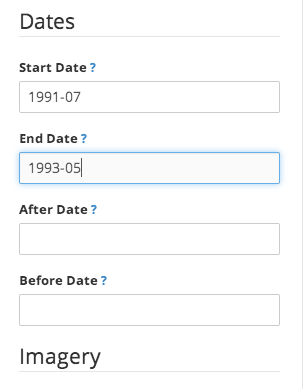
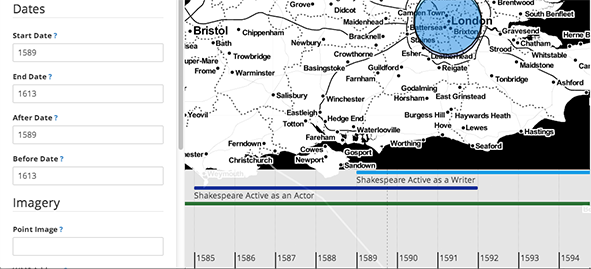
After and Before Dates
After and Before dates determine the duration of the event’s visibility in the exhibit and on the waypoints side bar, based on the position of the timeline.
For example, a record with an After Date of 1589-09-23 and a Before Date of 1613-04-26 would only be visible to a viewer when the center-line of the time is positioned between September 23, 1589 and April 26, 1613. At any other position on the timeline, the event’s geometry is invisible.
Date Formatting
SIMILE Timeline requires the use of the ISO-8601 format for the date fields. Dates can be entered in a range from just the year, down to minutes and seconds.
The basic format for dates is YYYY-MM-DDTHH:MM:SS, where T is the delimiter alerting the software that a Time value follows. Here are some examples
CE Dates
-
1564 (the year 1564)
-
1564-04 (April, 1564)
-
1564-04-23 (April 23, 1564)
-
1564-04-23T08:30 (8:30AM on April 23, 1564)
-
1564-04-23T0808:30:15 (15 seconds after 8:30AM on April 23, 1564)
BCE Dates
SIMILE Timeline can also render BCE dates, but the format is slightly different. Please note that the software CANNOT calculate that there is no Year 0, so BCE dates must be adjusted to account for this.
-
-001563 (the year 1564 BCE)
-
-000563 (the year 564 BCE)
-
-000063 (the year 64 BCE)
-
-000003 (the year 4 BCE)
-
-001563-04 (April, 1564 BCE)
-
-001563-04-23 (April 23, 1564 BCE)
Hours, minutes, and seconds may also be rendered for BCE dates in the same manner as the CE date examples above, should this be relevant to an event’s information.
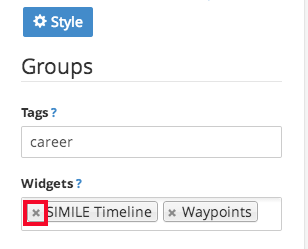
Removing a Neatline Item from the Timeline
To remove an item from the timeline, click the X on the Simile Timeline plugin selection on the Item Record’s Style tab and save the item record.
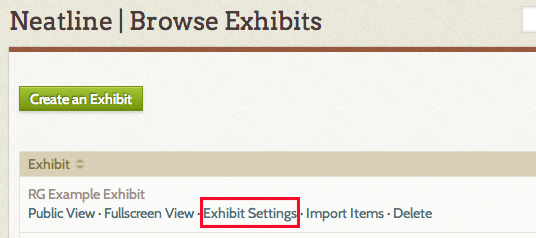
Disabling SIMILE Timeline for an Exhibit
From the Neatline Browse Exhibits Screen, select Exhibit Settings, scroll down to widgets, then click the X on the SIMILE Timeline plugin selection. Once SIMILE Timeline has been deselected, scroll to the bottom of the screen and click the Save Exhibit button to save the settings.