Importing SVG Documents
At a glance
- The basic drawing controls (points, lines, polygons) aren’t suitable for really complex illustrations.
- Instead, it’s better to create the graphics in specialized vector editors and import them into Neatline.
- Neatline can import SVG, a common format that can be generated by programs like Adobe Illustrator.
- Once a SVG document has been imported, the geometry has all the same characteristics as hand-drawn shapes.
Draw SVG
The standard “Draw Point/Line/Polygon” tools are good for simple, diagrammatic shapes - dots, rectangles, circles, simple arrows, etc. The problem, though, is that they don’t really scale well - what if you want to create a really smooth, intricate shape? Neatline exhibits are always exercises in information design, and there’s a class of “illustrative” annotation that doesn’t fit well into the blocky aesthetic supported by the standard-issue GIS tools. You could painstakingly sketch out complex illustrations using the line and polygon tools, but the resulting geometry is brittle and difficult to maintain. What if you decide later on that you want to change the drawing? You’d have to manually reposition hundreds or thousands of points.
To address this problem, Neatline 2.0 introduced the “Draw SVG” tool, which makes it possible to create high-fidelity, easily-maintained illustrations in specialized vector editing programs like Adobe Illustrator or Inkscape (and even in-browser tools like SVG-Edit) and import them directly into the Neatline editor. This way, you can do the difficult work of vector illustration in tools that are specifically designed for that task, and then drop the final products into Neatline exhibits. Later on, if you want to change something about the drawing, you can just go back to the original source file, make the change, and then update the Neatline exhibit with the new content.
Neatline reads a commonly-used serialization format called SVG (Scalable Vector Graphics), a form of XML that encodes geometric information. To start, you’ll need to save off your vector file as an SVG document.
Generating the SVG document
Using Adobe Illustrator:
-
Click File > Save As.
-
In the “Format” drop-down menu, select “SVG (svg).” The “SVG Options” modal should be displayed.
-
In the “Fonts” fieldset, set “Type” to Convert to outline. This ensures that text elements in the document will be saved as raw geometric paths, not abstract
<text>elements that can’t be parsed by Neatline. -
Click OK to save.
Using Inkscape:
-
Before saving, if you have any text elements in the document, first convert them to raw path elements by selecting them and entering Ctrl+Shift+C (see the documentation for more information.)
-
Click File > Save As.
-
In the dropdown menu for the format, select Plain SVG.
-
Click Save.
Importing the SVG into Neatline
Once the SVG document is saved off, we can import it into Neatline:

-
Find the
.svgfile that was created in the previous step. Open it with a plain text editor or a code editor by right clicking on the file and choosing a program from the list of options in “Open With.” It doesn’t matter what you use - as long as you can get at the raw SVG output. -
You should see a soup of dense XML markup with lots of numbers. Copy the content of the entire document to the clipboard.
-
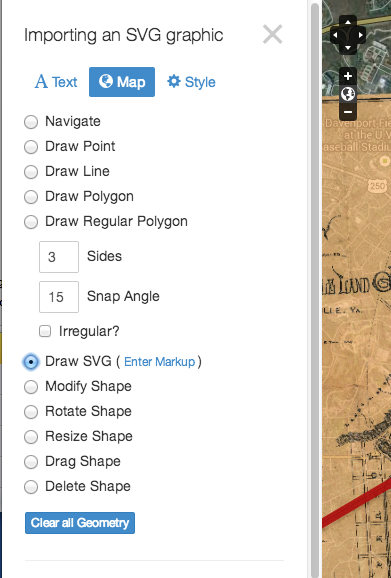
Go back to the Neatline editor and click on the Enter Markup link next to the Draw SVG option.
-
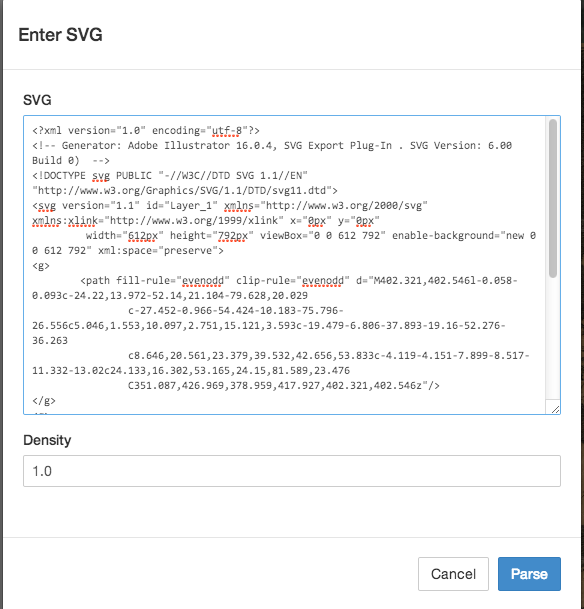
Paste the SVG markup into the “SVG” box.
-
Optionally, set a custom “Density” value. This field controls the number of points that Neatline will generate when converting SVG
<path>elements to hard-coded spatial coordinates - low numbers produce “blocky” shapes, high numbers produce “smooth” shapes. -
Click Parse. Behind the scenes, Neatline converts the SVG markup into geospatial coordinates.
-
Now, you can drag the SVG document onto the map in the same way that you would drag out a regular polygon shape. Move the cursor to the location on the map where you want the bottom left corner of the illustration to be located, click down, and move the cursor in any direction. The illustration will scale and rotate according to the position of the mouse.
-
When the illustration is positioned correctly, release the mouse button to lock the geometry into place.

Tip: It’s easy to make mistakes when doing this, and it often takes a couple tries to get things right. If you mess up, it’s easiest just to totally wipe out the previous attempt by clicking the “Clear all Geometry” button at the bottom of the form.
